Getting Practical with NavigationStack(path:)
Evolving a simple example into something that can apply to almost any real app

iOS 16 introduced a new way to push views onto a SwiftUI NavigationStack. It takes a parameter named path:.
While Apple's examples are really simple and easy to wrap your head around, I had trouble understanding how the examples would apply in my own app, a flash cards app.
In my app, I wanted to send the user to one specific view after tapping on my push notification.
Let's take a look at a simple example first, inspired by Apple's article on how to migrate away from (isActive:Bool). We'll put in some basic groundwork and understand key concepts to make the path parameter work for us.
Then, I'll show you how I was able to evolve this example into my app.
Easy example using Colors 🎨
struct ColorDetail: View {
    var color: Color // 6

    var body: some View {
        color.navigationTitle(color.description) // 7
    }
}

struct ContentView: View {
    @State private var path: [Color] = [.green, .mint] // 1

    var body: some View {
        NavigationStack(path: $path)  // 2
        { // 3
            VStack {
                Text("Insert any text here")
                    .font(.largeTitle)
            }
            .navigationDestination(for: Color.self) { color in  // 4
                ColorDetail(color: color) // 5
            }
            .navigationTitle("Bottom of the Stack")
        }
    }
}

struct ContentView_Previews: PreviewProvider {
    static var previews: some View {
        ContentView()
    }
}
Comment // 1
There are 2 important keys to point out:
Your type conforms to the Hashable protocol. Conveniently for us,
Coloris provided to us by SwiftUI and already conforms to Hashable. So there's no work on our part to get this conformance; we're getting this conformance for free.For demonstration purposes, we initialize this array to contain 2 colors. Note that in arrays: order is preserved. When you see this in preview, the first view you see contains the last color in the array:
.mint. When you tap the Back button, the next view contains.green. When Back is tapped again, you're back on the root view, which starts at comment// 3.
Feel free to play around with the values in this array! 🔴🟢
Comment // 2
We pass our binding variable $path to our data source. Nice that the name matches the parameter label of the same name.
In my app, I renamed my property from path to onTheStack. I think it's clearer, but feel free to name this whatever you like. Just make sure to keep this consistent with the variable declaration in comment // 1.
Comment // 3
What you put inside this closure is what will render in the root view of the navigation stack. In my code, I gave it the title "Bottom of the Stack."
I chose not to render a list of ColorDetail views here mainly to show A) yes, you have the freedom to display any View you want here; it doesn't have to be a list! And B) to create a clear distinction between the code of the root view (see comment // 2) and code of the destination views (see comment // 5).
Forgive me. I know it is not "Swifty" to put the opening brace here (it should go on the line above), so I do this only for the sake of accuracy and clarity in my explanation.
Comment // 4
Essentially, .navigationDestination maps our data type (in this example Color) to a View. In this line, we define the data type.
What you pass to the parameter for: should match the element type in your path array. In this example, the array was an array of Color, so the type here is Color.self, the struct itself (as opposed to an instance of Color).
Comment // 5
This is the other half of our mapping: what view is rendered when given the data type. Here, we pass our color as a parameter to the ColorDetail view.
Comment // 6
We declare a single property on this struct: var color: Color. The body depends on this value being available to know which color will be presented.
Comment // 7
In this single line, we define how a ColorDetail presents a color. If we get a .purple Color, we will see the purple color 🟣 in full screen with the navigation title set to the given color's name: "Purple." This name is made possible through the .description property.
But my data type is not a Color 😫
Color doesn't represent my app either. The SwiftUI views that I want to push are named SettingsView and ResultsView.
How do I adapt this example for my app which has named views?
Route to your View 🛣️
I learned this trick from a presentation Tunds gave at Deep Dish Swift 2023.
Our goal is to push any SwiftUI view we want onto the NavStack, but every view has different needs (different properties). We need something to help us capture the idea of getting to our views.
The idea of "getting somewhere" sounds like a "route." And because the number of views we have is finite, we can represent route as an enum. Each of your views could be a single enum case.
enum Route {
    case results
    case settings
    case resendQuestion
}
The beautiful thing about this is that with simple enums like this, the conformance to Hashable is automatic:
Your own custom types can be hashable as well. When you define an enumeration without associated values, it gains Hashable conformance automatically -- developer.apple.com
Now we can update our ContentView, replacing colors with routes.
struct ContentView: View {
    @State private var path: [Route] = [.results, .settings, .resendQuestion] // 1

    var body: some View {
        NavigationStack(path: $path)  // 2
        { // 3
            VStack {
                Text("Insert any text here")
                    .font(.largeTitle)
            }
            .navigationDestination(for: Route.self) { route in  // 4
                RouteDetail(route: route) // 5
            }
            .navigationTitle("Bottom of the Stack")
        }
    }
}
Comment // 1
Straight forward here. Replace Color with Route. And then assign some Route cases to the array. I added all of them just for demo purposes.
Comment // 2
No change to NavigationStack(path:)
Comment // 3
No change to the root view.
Comment // 4
Replace Color with Route, and replace the closure's parameter color with route
Comment // 5
No surprise again, replacing ColorDetail with RouteDetail and replacing both the parameter label and parameter variable with route.
Now let's define RouteDetail.
struct RouteDetail: View { // 6
    var route: Route // 7

    var body: some View {
        switch route { // 8
        case .results:
            VStack { // 9
                Text("96%")
                    .font(.largeTitle.italic())
                    .navigationTitle("Your Score")
            }
        case .settings:
            List { // 10
                Text("Item 1")
                Text("Item 2")
            }
            .navigationTitle("Settings")
        case .resendQuestion:
            Button("Resend question") { // 11
                print("resending!")
            }
        }
    }
}
Comment // 6
Rename ColorDetail to RouteDetail.
RouteDetail is like an Air Traffic Controller, who is responsible for telling planes both in the sky and on the tarmac when and where to land or take off. RouteDetail is making a determination the moment a Route come in what view should be presented.
Are you a .result? Show the score view.
Are you a .settings? Show the settings view.
Comment // 7
Here, we define a property named route. This serves as our input.
Comment // 8
This switch statement is the exact moment when a decision is made on the Route.
We can present whatever View(s) we want in each of those cases.
But this is messy and hard to read. With a quick refactor, we can move the details of each case into its own View!
Comment // 9
Let's put all the code related to presenting results into a View named ResultsView.
Comment // 10
Let's put all the code related to presenting settings into a View named SettingsView.
Comment // 11
Let's put all the code related to presenting resending a question into a View named ResendQuestionView.
For the sake of not overdoing this, I'll show the refactoring of the first case (Comment // 8).
struct ResultsView: View {
    var body: some View {
        VStack { // 7
            Text("96%")
                .font(.largeTitle.italic())
                .navigationTitle("Your Score")
        }
    }
}

struct RouteDetail: View {
    var route: Route

    var body: some View {
        switch route { // 6
        case .results:
            ResultsView()
        // ...
}
So all I did was just move that results view code into its own struct and named it ResultsView.
Rinse and repeat for the remaining cases.
But my view has properties! 🧳
Let's say we have a view that renders a card with a number on it.
enum Route {
    case card(i: Int) // 2
    case results
    case settings
    case resendQuestion
}

struct CardView: View { // 1
    var number: Int

    var body: some View {
        Text("\(number))")
            .font(.largeTitle).bold()
    }
}
Comment // 1
CardView has a single property: an Int. The view presents the value of that integer on the screen. So if we create a struct like CardView(number: 9), we'll see "9" on the screen.
Comment // 2
Enum Associated Values to the rescue!
Notice that I labeled my parameter i. You could make this label match that of the view's property if you prefer. I did this merely to distinguish between this, the parameter of a Route.card(i:) and the parameter of the View initializer CardView(number:).
Ahhh! 2 Errors 🛑🛑
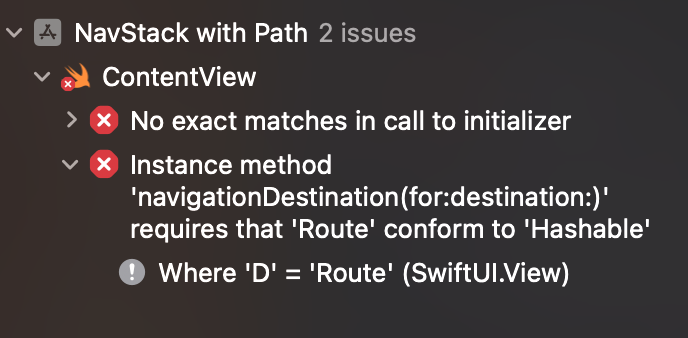
Not to worry. Let's take a look at these 2 errors.
These are the order in which they appeared for me:
No exact matches in call to initializer
Instance method 'navigationDestination(for:destination:)' requires that 'Route' conform to 'Hashable'
Long story short: we need to address the 2nd error. The 1st error is happening as a side effect because of the 2nd.
The 2nd error is saying we need to conform Route to Hashable.
So what if we just make our conformance explicit?
enum Route: Hashable { // 1
    case card(i: Int)
    case results
    case settings
    case resendQuestion
}
Comment // 1
We suffix : Hashable to our Route.
Voilà! Errors gone! 😄
Note: Int already conforms to Hashable, so we are getting this conformance for free.
If you use a custom struct/class as your associated value, it's critical that it too conform to Hashable, and that conformance applies to all the turtles below them! 🐢
Testing CardView
struct ContentView: View {
    @State private var path: [Route] = [.card(i: 12)] // 1
Comment // 1
In ContentView, let's push a card route to the stack with the number 12.
It works!
Let's review!
We created a
Routeenum to capture the idea of getting to a view.RouteDetaildoes the work of accepting aRouteand transforming it into an actual SwiftUIView.NavigationStack(path:)accepts an array of 0 or more items. The elements of this array are pushed in order onto the NavStack, with the last element being at the top of the stack (i.e. the first thing you see).The data type of that array must conform to
Hashable. If you have a custom type, all of the types within it must also conform.
To be continued
In my app, I initialize my @State array in ContentView with an empty array [].
Typically, we only want to push a view onto the stack when the user taps a widget or a push notification.
In my next article, I will explain how I was able to push a specific route to the NavStack after the user taps a push notification.


